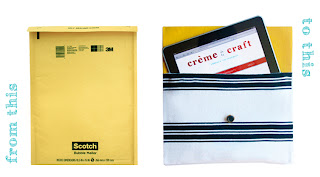
A bubble mailer is the perfect object to upcycle for this DIY project, because not only is it the ideal size and shape for a tablet, but its very function is to protect your stuff! So next time you receive a package in the mail, keep the envelope, cover it up with your favorite fabric and you've got a custom case for your iPad, iPod, laptop or phone. Or make it a DIY party at the next girls-night-in. You can even use it as a stylish clutch when you're out and about.
------------------------------------------------------
Una busta imbottita con le bolle d'aria è l'oggetto ideale per questo progetto fai da te, non solo ha la dimensione ideale e la forma di una tavoletta grafica ma è ideale per proteggerla! La prossima volta che ricevete un pacco per posta, tenete la busta, copritela con il vostro tessuto preferito e avrete una custodia personalizzata per il vostro iPad, iPod, laptop o telefono. Potrebbe anche essere una elegantissima pochette per la sera!

Materials / Materiali:
• Bubble Mailer (10.5in. x 11in.) /
Busta imbottita con le bolle d'aria
• Fabric (or repurpose pieces from an old t-shirt, dress or jeans) /
Stoffa (magari riciclata da una vecchia magliatta, un vestito o dei jeans)
• Adhesive (glue gun, tacky glue, stapler and/or small brads) /
Colla a caldo o nastro adesivo, Cucitrice o piccole clip
• 2 Buttons /
2 bottoni
• Needle & Thread /
Ago e filo
• Piece of Ribbon or String (approximately 8 in.) /
Nastro o Stringa (circa 20 cm)
• Scissors/
Forbici

1. To measure the correct size for your case, slide your tablet horizontally into the envelope. Cut along one side of the envelope, leaving the back layer a few inches longer to create a flap for your case. /
Per misurare le dimensioni adatte al vostro iPad, iPod, laptop o telefono, far scorrere la tavoletta orizzontale nella busta. Tagliare lungo un lato della busta, lasciando lo strato posteriore di qualche centimetro più lungo per creare un lembo per il vostro cas
2. Line the inside of the envelope with your first piece of fabric. I used a stapler and small brads to secure the fabric onto the envelope. You can also use tacky glue or a glue gun instead./
Foderate l'interno della busta con il primo pezzo di tessuto. Potete usare una cucitrice e piccole clip o la colla a caldo per fissare il tessuto alla busta.
3.Apply the next piece of fabric so that it covers the base of the envelope completely (front and back)/
Applicate un altro pezzo di tessuto per coprire completamente la base della busta (fronte e retro).
4. Cover the flap with your third piece of fabric. The envelope should now be completely covered./
Coprite la linguetta con un terzo pezzo di tessuto. La busta ora sarà completamente coperta
Con ago e filo, cucite un bottone sul lembo ed uno sulla base della busta.
6. Grab your ribbon or string and knot it onto one of the buttons to make a string-and-button closure for your case.
Prendete il nastro o la stringa e fate un nodo su uno dei bottoni per chiudere la custodia
Nessun commento:
Posta un commento